OpenClaw 安装使用指南
发表于|更新于
|总字数:5.1k|阅读时长:21分钟|浏览量:
OpenClaw 安装使用指南

什么是 OpenClaw?
OpenClaw 是一款于 2026 年初迅速流行的开源 AI 智能体,主打本地化部署。
它能够理解用户的自然语言指令,并像一位真正的数字员工那样,在用户的电脑或服务器上主动执行各类任务。
名称演变
| 时期 |
名称 |
说明 |
| 最初 |
Clawdbot |
因与 Anthropic 的 “Claude” 过于相似 |
| 第一次更名 |
Moltbot |
因发音和传播问题未被长期采用 |
| 最终名称 |
OpenClaw |
明确开源属性,保留龙虾意象,象征强大的执行能力 |
OpenClaw 能干什么?
简单来说,你可以把它理解为一个运行在你自家设备(电脑、服务器甚至树莓派)上的“钢铁侠贾维斯”。
它与普通聊天机器人的最大区别:
| 特性 |
说明 |
| 行动力 |
不仅能回答问题,更能直接操作系统(管理文件、运行命令、控制浏览器)完成任务 |
| 自主性 |
具备长期记忆,可持续运行并主动跟进任务,无需反复提醒 |
| 隐私性 |
数据存储在本地,无需上传云端,对重视隐私的用户更友好 |
获取Nvidia apikey
自行注册一个账号,可能要国外的手机号
https://build.nvidia.com
然后去设置创建好apikey
安装openclaw(Linux)
本次选用ubuntu 24.04LTS,应该大部分的都会一样
采用一键安装
1
| curl -fsSL https://openclaw.ai/install.sh | bash -s -- --install-method git
|
下面的我给你输出成中文啦
1
2
3
4
5
6
7
8
9
10
11
12
13
14
15
16
17
18
19
20
21
22
23
24
25
26
27
| 🦞 OpenClaw 已成功安装 (2026.3.7-beta.1)!
安装完成。你的生产力可能即将变得有点“奇怪”。
源码安装信息
代码目录: /root/openclaw
命令包装器: /root/.local/bin/openclaw
更新命令: openclaw update --restart
切换为 npm 安装: curl -fsSL --proto '=https' --tlsv1.2 https://openclaw.ai/install.sh | bash -s -- --install-method npm
🦞 OpenClaw 2026.3.7-beta.1 (d967009)
如果它能正常运行,那就是自动化;如果它坏了,那就是一次“学习机会”。
控制面板地址: http://127.0.0.1:18789/
无法复制到剪贴板。
未检测到图形界面。请在你的电脑上打开:
ssh -N -L 18789:127.0.0.1:18789 root@192.168.48.128
然后在浏览器打开:
http://localhost:18789/
文档:
https://docs.openclaw.ai/gateway/remote
https://docs.openclaw.ai/web/control-ui
常见问题:
https://docs.openclaw.ai/start/faq
root@ubuntu24:~#
|
但是现在还没启动,用不了,只是安装了
现在配置一些基础的配置,添加环境变量
1
2
3
| echo 'export PATH="/root/.local/bin:$PATH"' >> ~/.bashrc
source ~/.bashrc
openclaw --version
|
npm和pnpm更换国内源
1
2
3
4
5
6
|
npm config set registry https://registry.npmmirror.com
pnpm config set registry https://registry.npmmirror.com
|
进行openclaw初始化
1
2
3
4
5
6
7
8
9
10
11
12
13
14
15
16
17
18
19
20
21
22
23
24
25
26
27
28
29
30
31
32
33
34
35
36
37
38
39
40
41
42
43
44
45
46
47
48
49
50
51
52
53
54
55
56
57
58
59
60
61
62
63
64
65
66
67
68
69
70
71
72
73
74
75
76
77
78
79
80
81
82
83
84
85
86
87
88
89
90
91
92
93
94
95
96
97
98
99
100
101
102
103
104
105
106
107
108
109
110
111
112
113
114
115
116
117
118
119
120
121
122
123
124
125
126
127
128
129
130
131
132
133
134
135
136
137
138
139
140
141
142
143
144
145
146
147
148
149
150
151
152
153
154
155
156
157
158
159
160
161
162
163
164
165
166
167
168
169
170
171
172
173
174
175
176
177
178
179
180
181
182
183
184
185
186
187
188
189
190
191
192
193
194
195
196
197
198
199
200
201
202
203
204
205
206
207
208
209
210
211
212
213
214
215
216
|
◆ I understand this is personal-by-default and shared/multi-user use requires lock-down. Continue?
│ ● Yes / ○ No
│
◆ Onboarding mode
│ ● QuickStart (Configure details later via openclaw configure.)
│ ○ Manual
│
◇ Model/auth provider
│ Skip for now
│
◆ Filter models by provider
│ ● All providers
│ ○ amazon-bedrock
│ ○ anthropic
│ ○ azure-openai-responses
│ ○ cerebras
│ ......#省略其他模型
│
◆ Default model
│ ● Keep current (default: anthropic/claude-opus-4-6)
│ ○ Enter model manually
│ ○ amazon-bedrock/anthropic.claude-3-haiku-20240307-v1:0
│ ○ amazon-bedrock/anthropic.claude-3-5-haiku-20241022-v1:0
│ ......#省略其他模型
│
◆ Select channel (QuickStart)
│ ○ Feishu/Lark (飞书)
│ ○ Nostr (NIP-04 DMs)
│ ○ Microsoft Teams (Bot Framework)
│ ......#省略其他聊天渠道
│ ● Skip for now (You can add channels later via `openclaw channels add`)
│
◆ Search provider
│
│ ● Perplexity Search (Structured results · domain/language/freshness filters)
│ ○ Brave Search
│ ○ Gemini (Google Search)
│ ○ Grok (xAI)
│ ○ Kimi (Moonshot)
│ ○ Skip for now
│
◆ Configure skills now? (recommended)#安装一些技能
│ ○ Yes / ● No
│
◇ Hooks ──────────────────────────────────────────────────────────────────╮
│ │
│ Hooks 允许在 Agent 执行命令时自动触发一些操作。 │
│ 示例:当你执行 /new 或 /reset 时,将当前会话上下文保存到记忆中。 │
│ │
│ 了解更多: https://docs.openclaw.ai/automation/hooks │
│ │
├──────────────────────────────────────────────────────────────────────────╯
│
◆ 启用 Hooks?
│ ◼ Skip for now
│ ◻ 🚀 boot-md
│ ◻ 📎 bootstrap-extra-files
│ ◻ 📝 command-logger
│ ◻ 💾 session-memory
配置覆盖: /root/.openclaw/openclaw.json
(sha256 04331fbe32a493ec0cec109690cb2af9d2877eaf002815d6727f9ea76a340318 -> a82aa7ca23101cce4f9e593ca11e282dd8f132def4c948d05ba5022e1b1a39b2,备份=/root/.openclaw/openclaw.json.bak)
◇ Systemd ─────────────────────────────────────────────────────────────╮
│ │
│ Linux 安装默认使用 systemd 的用户服务。 │
│ 如果没有启用 lingering,systemd 在用户注销或空闲时会结束用户会话, │
│ 并终止 Gateway 服务。 │
│ 现在正在启用 lingering(可能需要 sudo;会写入 │
│ /var/lib/systemd/linger)。 │
│ │
├────────────────────────────────────────────────────────────────────────╯
◇ Systemd ─────────────────────────────╮
│ │
│ 已为 root 启用 systemd lingering。 │
│ │
├───────────────────────────────────────╯
◇ Gateway 服务运行环境 ───────────────────────────────────────────────╮
│ │
│ QuickStart 使用 Node 作为 Gateway 服务运行环境(稳定且受支持)。 │
│ │
├──────────────────────────────────────────────────────────────────────╯
◑ 正在安装 Gateway 服务…
已安装 systemd 服务:
/root/.config/systemd/user/openclaw-gateway.service
◇ Gateway 服务安装完成。
◇
Agents: main(默认)
心跳间隔: 30 分钟(main)
会话存储(main):
/root/.openclaw/agents/main/sessions/sessions.json(0 条记录)
◇ 可选应用 ───────────────────────────────────────────────╮
│ │
│ 可以添加节点以获得额外功能: │
│ - macOS 应用(系统集成 + 通知) │
│ - iOS 应用(摄像头 / 画布) │
│ - Android 应用(摄像头 / 画布) │
│ │
├──────────────────────────────────────────────────────────╯
◇ 控制界面(Control UI) ─────────────────────────────────────────────╮
│ │
│ Web UI: http://127.0.0.1:18789/ │
│ Web UI(带 token): │
│ http://127.0.0.1:18789/#token=6d04566b767c56970db68910e8a8534c68107ba09dd914db │
│ │
│ Gateway WebSocket: ws://127.0.0.1:18789 │
│ Gateway 状态: 可访问 │
│ │
│ 文档: https://docs.openclaw.ai/web/control-ui │
│ │
├──────────────────────────────────────────────────────────────────────╯
◇ 启动 TUI(最佳选项!) ─────────────────────────────────────────────╮
│ │
│ 这是让你的 Agent 真正开始工作的关键步骤。 │
│ 请花一点时间完成它。 │
│ 你提供的信息越多,体验就越好。 │
│ 系统将发送消息: “Wake up, my friend!”(醒来吧,我的朋友!) │
│ │
├────────────────────────────────────────────────────────────────────╯
◇ Token ────────────────────────────────────────────────────────────╮
│ │
│ Gateway token:Gateway 与 Control UI 共享的认证令牌。 │
│ │
│ 存储位置: │
│ ~/.openclaw/openclaw.json (gateway.auth.token) │
│ 或环境变量 OPENCLAW_GATEWAY_TOKEN │
│ │
│ 查看 token: │
│ openclaw config get gateway.auth.token │
│ │
│ 生成 token: │
│ openclaw doctor --generate-gateway-token │
│ │
│ Web UI 会在当前浏览器标签页中保存 dashboard token,加载后会 │
│ 从 URL 中移除。 │
│ │
│ 随时打开控制台: │
│ openclaw dashboard --no-open │
│ │
│ 如果提示输入: │
│ 将 token 粘贴到 Control UI 设置中 │
│ (或直接使用带 token 的 dashboard URL)。 │
│ │
├────────────────────────────────────────────────────────────────────╯
◆ 你想如何启动(孵化)你的机器人?
│
│ ○ 在 TUI 中启动(推荐)
│ ● 打开 Web UI
│ ○ 稍后再做
◇ 仪表盘已准备就绪 ────────────────────────────────────────────────────────────────╮
│ │
│ 仪表盘链接(包含 token): │
│ http://127.0.0.1:18789/#token=6d04566b767c56970db68910e8a8534c68107ba09dd914db │
│ │
│ 在这台机器的浏览器中复制/粘贴此 URL,即可控制 OpenClaw。 │
│ │
│ 未检测到图形界面(GUI)。请从你的电脑打开: │
│ ssh -N -L 18789:127.0.0.1:18789 root@192.168.48.128 │
│ │
│ 然后在浏览器打开: │
│ http://localhost:18789/ │
│ http://localhost:18789/#token=6d04566b767c56970db68910e8a8534c68107ba09dd914db │
│ │
│ 文档: │
│ https://docs.openclaw.ai/gateway/remote │
│ https://docs.openclaw.ai/web/control-ui │
│ │
├──────────────────────────────────────────────────────────────────────────────────╯
◇ 工作空间备份 ───────────────────────────────────────────────╮
│ │
│ 请备份你的 Agent 工作空间。 │
│ 文档: https://docs.openclaw.ai/concepts/agent-workspace │
│ │
├──────────────────────────────────────────────────────────────╯
◇ 安全 ──────────────────────────────────────────────────────╮
│ │
│ 在你的电脑上运行 Agent 存在一定风险 —— 请加固你的环境: │
│ https://docs.openclaw.ai/security │
│ │
├─────────────────────────────────────────────────────────────╯
◇ Shell 自动补全 ────────────────────────────────────────────╮
│ │
│ 已安装 Shell 自动补全。 │
│ 重新启动终端,或运行: │
│ source ~/.bashrc
│ │
├─────────────────────────────────────────────────────────────╯
◇ Web 搜索 ──────────────────────────────────────────────────╮
│ │
│ 已跳过 Web 搜索配置。 │
│ 你可以稍后启用: │
│ openclaw configure --section web │
│ │
│ 文档: https://docs.openclaw.ai/tools/web │
│ │
├─────────────────────────────────────────────────────────────╯
◇ 接下来做什么 ──────────────────────────────────────────────╮
│ │
│ 示例项目: https://openclaw.ai/showcase │
│ (“大家都在构建什么”) │
│ │
├─────────────────────────────────────────────────────────────╯
└ 初始化完成。使用上面的仪表盘链接即可控制 OpenClaw。
root@ubuntu24:~#
|
验证安装
1
2
3
4
5
6
7
| root@ubuntu24:~# ss -ntlp | grep openclaw
LISTEN 0 511 127.0.0.1:18791 0.0.0.0:* users:(("openclaw-gatewa",pid=46933,fd=27))
LISTEN 0 511 127.0.0.1:18789 0.0.0.0:* users:(("openclaw-gatewa",pid=46933,fd=22))
LISTEN 0 511 127.0.0.1:18792 0.0.0.0:* users:(("openclaw-gatewa",pid=46933,fd=28))
LISTEN 0 511 [::1]:18789 [::]:* users:(("openclaw-gatewa",pid=46933,fd=23))
root@ubuntu24:~#
|
openclaw基础命令和配置文件
| 命令 |
功能说明 |
openclaw onboard |
引导/初始化配置 OpenClaw(第一次安装时用) |
openclaw update |
更新 OpenClaw(可加 --restart 自动重启) |
openclaw dashboard |
打开 Web 控制面板(可加 --no-open 只输出 URL) |
openclaw config get <key> |
查看当前配置项,例如 gateway.auth.token |
openclaw config set <key> <value> |
修改配置项 |
openclaw doctor |
系统检查工具,可生成 token 或修复问题 |
openclaw doctor --generate-gateway-token |
生成新的网关令牌 |
openclaw configure --section web |
配置 Web 搜索相关功能 |
openclaw agents list |
查看已注册的代理 |
openclaw agents reset <agent> |
重置某个代理的状态 |
openclaw logs |
查看 OpenClaw 日志 |
openclaw help |
查看所有可用命令 |
| 文件路径 |
作用 |
~/.openclaw/openclaw.json |
核心配置文件,存储网关、代理、会话、令牌等设置 |
~/.openclaw/workspace |
代理工作空间,存储会话、日志、缓存等数据 |
~/.config/systemd/user/openclaw-gateway.service |
systemd 用户服务文件,用于后台启动网关 |
~/.openclaw/agents/main/sessions/sessions.json |
默认代理的会话存储(0 条记录表示空) |
/root/openclaw |
OpenClaw 源码或安装目录 |
/root/.local/bin/openclaw |
命令行包装器,可在终端直接执行 openclaw |
| 项目 |
说明 |
| Gateway |
网关服务,监听本地端口,提供 Web UI 和 API 接口 |
| Agent |
代理,用于执行任务和处理会话 |
| Session |
会话上下文,用于保持对话状态 |
| Hooks |
自动化动作,当代理接收到命令时触发(如保存会话) |
| TUI |
终端界面模式(Text UI),用于初始化和交互 |
| Token |
网关认证令牌,用于 Web UI 或 API 访问 |
解读openclaw的配置文件
1
| cat .openclaw/openclaw.json
|
1
2
3
4
5
6
7
8
9
10
11
12
13
14
15
16
17
18
19
20
21
22
23
24
25
26
27
28
29
30
31
32
33
34
35
36
37
38
39
40
41
42
43
44
45
46
47
48
49
50
51
52
53
54
55
56
57
58
59
60
61
62
63
| {
"wizard": { // 向导配置
"lastRunAt": "2026-03-08T05:13:58.339Z", // 上次运行时间
"lastRunVersion": "2026.3.7-beta.1", // 上次运行的 OpenClaw 版本
"lastRunCommand": "onboard", // 上次运行的命令
"lastRunMode": "local" // 上次运行模式
},
"agents": { // 代理配置
"defaults": { // 默认代理设置
"workspace": "/root/.openclaw/workspace", // 代理工作空间路径
"compaction": {
"mode": "safeguard" // 会话压缩模式
},
"maxConcurrent": 4, // 最大并发代理数量
"subagents": {
"maxConcurrent": 8 // 子代理最大并发数量
}
}
},
"tools": { // 工具配置
"profile": "coding" // 使用的工具配置文件(如 coding、default 等)
},
"messages": { // 消息配置
"ackReactionScope": "group-mentions" // 回复/确认反应范围
},
"commands": { // 命令行为配置
"native": "auto", // 原生命令自动处理模式
"nativeSkills": "auto", // 原生技能自动处理模式
"restart": true, // 是否允许重启命令
"ownerDisplay": "raw" // 拥有者显示模式
},
"session": { // 会话配置
"dmScope": "per-channel-peer" // 私聊会话范围
},
"gateway": { // 网关配置
"port": 18789, // 网关端口
"mode": "local", // 网关模式(local 或 remote)
"bind": "loopback", // 绑定地址(loopback = 仅本地)
"auth": { // 认证配置
"mode": "token", // 认证模式(token 或 password)
"token": "6d04566b767c56970db68910e8a8534c68107ba09dd914db" // 网关令牌
},
"tailscale": { // Tailscale 配置
"mode": "off", // Tailscale 模式
"resetOnExit": false // 退出时是否重置
},
"nodes": { // 节点权限配置
"denyCommands": [ // 禁止使用的命令列表
"camera.snap", // 拍照
"camera.clip", // 录制视频
"screen.record", // 屏幕录制
"contacts.add", // 添加联系人
"calendar.add", // 添加日历事件
"reminders.add", // 添加提醒
"sms.send" // 发送短信
]
}
},
"meta": { // 元信息
"lastTouchedVersion": "2026.3.7-beta.1", // 上次修改的版本
"lastTouchedAt": "2026-03-08T05:13:58.346Z" // 上次修改时间
}
}
|
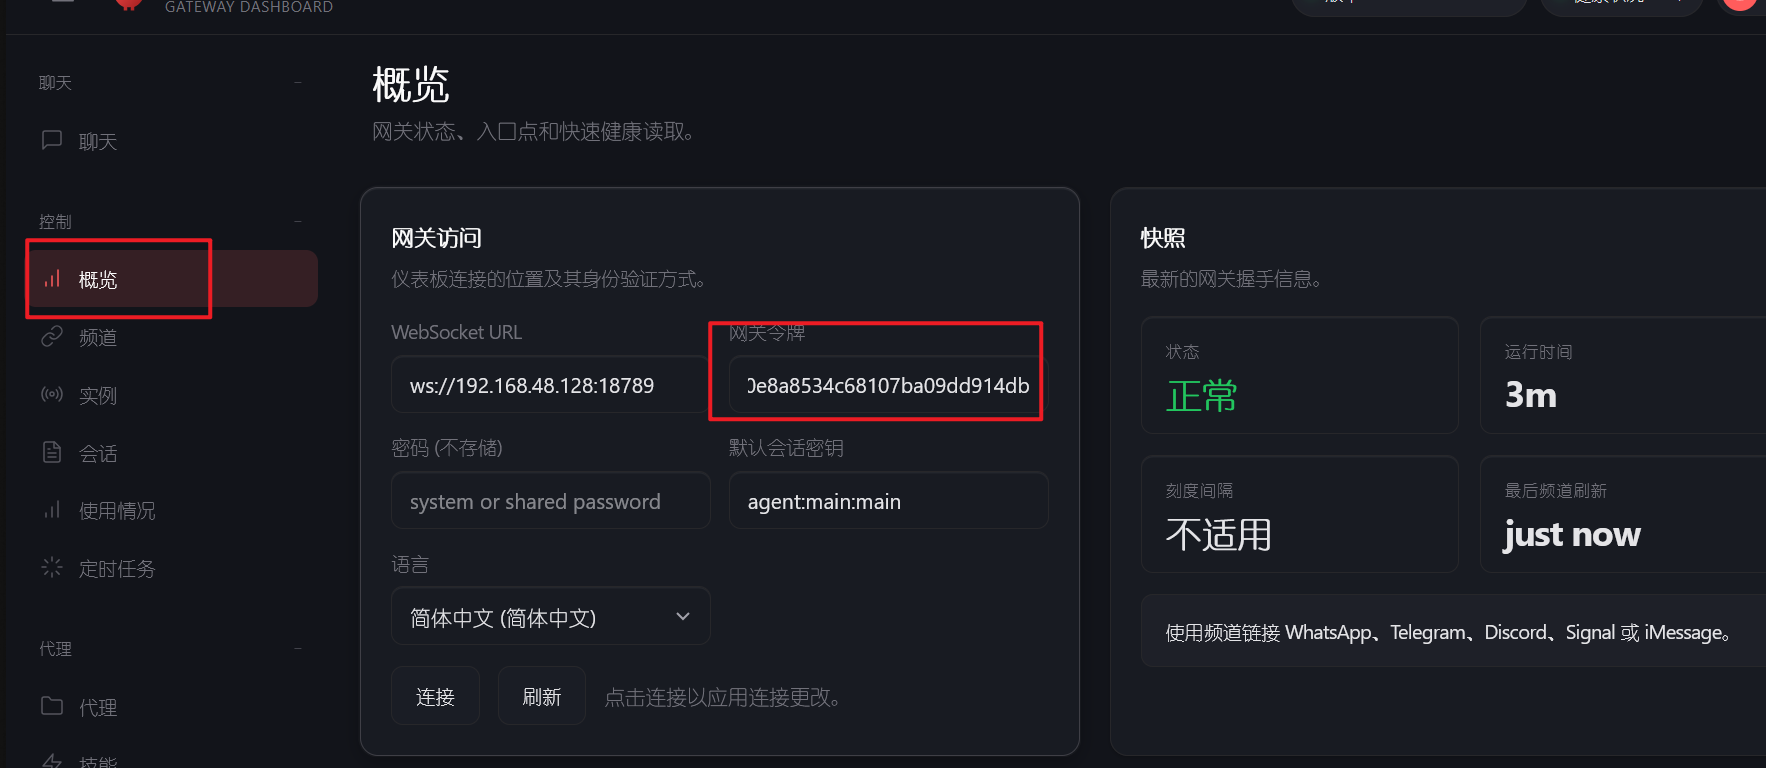
访问openclaw页面
这时候我都虚拟机的ip是192.168.48.128
你是不是就回去访问http://192.168.48.128:18789
肯定是行不通的,因为他的配置文件配置的是回环地址,只能这个虚拟机的127.0.0.1访问
1
2
3
4
| "gateway": { // 网关配置
"port": 18789, // 网关端口
"mode": "local", // 网关模式(local 或 remote)
"bind": "loopback", // 绑定地址(loopback = 仅本地)
|
但是你在自己的电脑要怎么访问呢
方法一
在自己的电脑的cmd或者bash,进行端口转发
1
2
3
4
5
6
7
8
|
ssh-keygen -R 192.168.48.128
ssh -N -L 18789:127.0.0.1:18789 root@192.168.48.128
然后弹出密码,输入密码回车即可
|
这个时候你会出现卡住

注意这不是卡了,这表明端口转发已经成功
ssh -N -L 18789:127.0.0.1:18789 root@192.168.48.128
ssh:使用 SSH 协议连接远程主机。
-N:不执行远程命令,只建立隧道。
-L 18789:127.0.0.1:18789:
- 本地端口
18789 → 虚拟机的 127.0.0.1:18789
- 意思是:你在本地访问
localhost:18789 时,实际上访问的是虚拟机的 OpenClaw 网关。
root@192.168.48.128:登录虚拟机的用户名和 IP。
这是和浏览器访问http://localhost:18789/就会出现openclaw的页面了
这时候如果你的终端也就是你自己电脑的cmd/bash被你关掉了,或者ctrl+c断开了,那页面也就会断开,就是端口转发关闭了
方法二
通过前面的配置文件解析,可以知道
1
2
3
4
| "gateway": { // 网关配置
"port": 18789, // 网关端口
"mode": "local", // 网关模式(local 或 remote)
"bind": "loopback", // 绑定地址(loopback = 仅本地)
|
如果是custom必须要这样(推荐测试环境)
1
2
3
4
5
6
7
8
9
10
11
12
| "gateway": {
"port": 18789,
"mode": "local",
"bind": "custom",
"customBindHost": "0.0.0.0",
"controlUi": {
"allowedOrigins": [
"http://192.168.48.128:18789"
],
"allowInsecureAuth": true,
"dangerouslyDisableDeviceAuth": true
},
|
也可以命令设置
1
2
| openclaw config set gateway.bind custom
openclaw config set gateway.customBindHost 0.0.0.0
|
重启服务
1
| openclaw gateway restart
|
然后你就可以通过http://192.168.48.128:18789/ 去访问openclaw web ui了
安装openclaw(docker)
自行安装docker和docker-compose
1
2
3
4
5
6
7
8
9
10
11
12
13
14
15
16
17
18
| docker pull ghcr.io/openclaw/openclaw:latest
mkdir ~/openclaw && cd ~/openclaw
export OPENCLAW_IMAGE=ghcr.io/openclaw/openclaw:latest
curl -o docker-compose.yml https://raw.githubusercontent.com/openclaw/openclaw/main/docker-compose.yml
mkdir -p ~/.openclaw/
curl -o docker-setup.sh https://raw.githubusercontent.com/openclaw/openclaw/main/docker-setup.sh
sed -i 's/docker compose/docker-compose/g' docker-setup.sh
bash docker-setup.sh
docker-compose run --rm --entrypoint sh openclaw-cli -lc '
openclaw config set gateway.auth.mode password
openclaw config set gateway.auth.password "qianyios"
openclaw config set gateway.bind custom
openclaw config set gateway.customBindHost 0.0.0.0
openclaw config set gateway.controlUi.allowInsecureAuth true
openclaw config set gateway.controlUi.dangerouslyDisableDeviceAuth true
'
docker-compose up -d --force-recreate openclaw-gateway
|
访问页面就是http://192.168.48.128:18789/
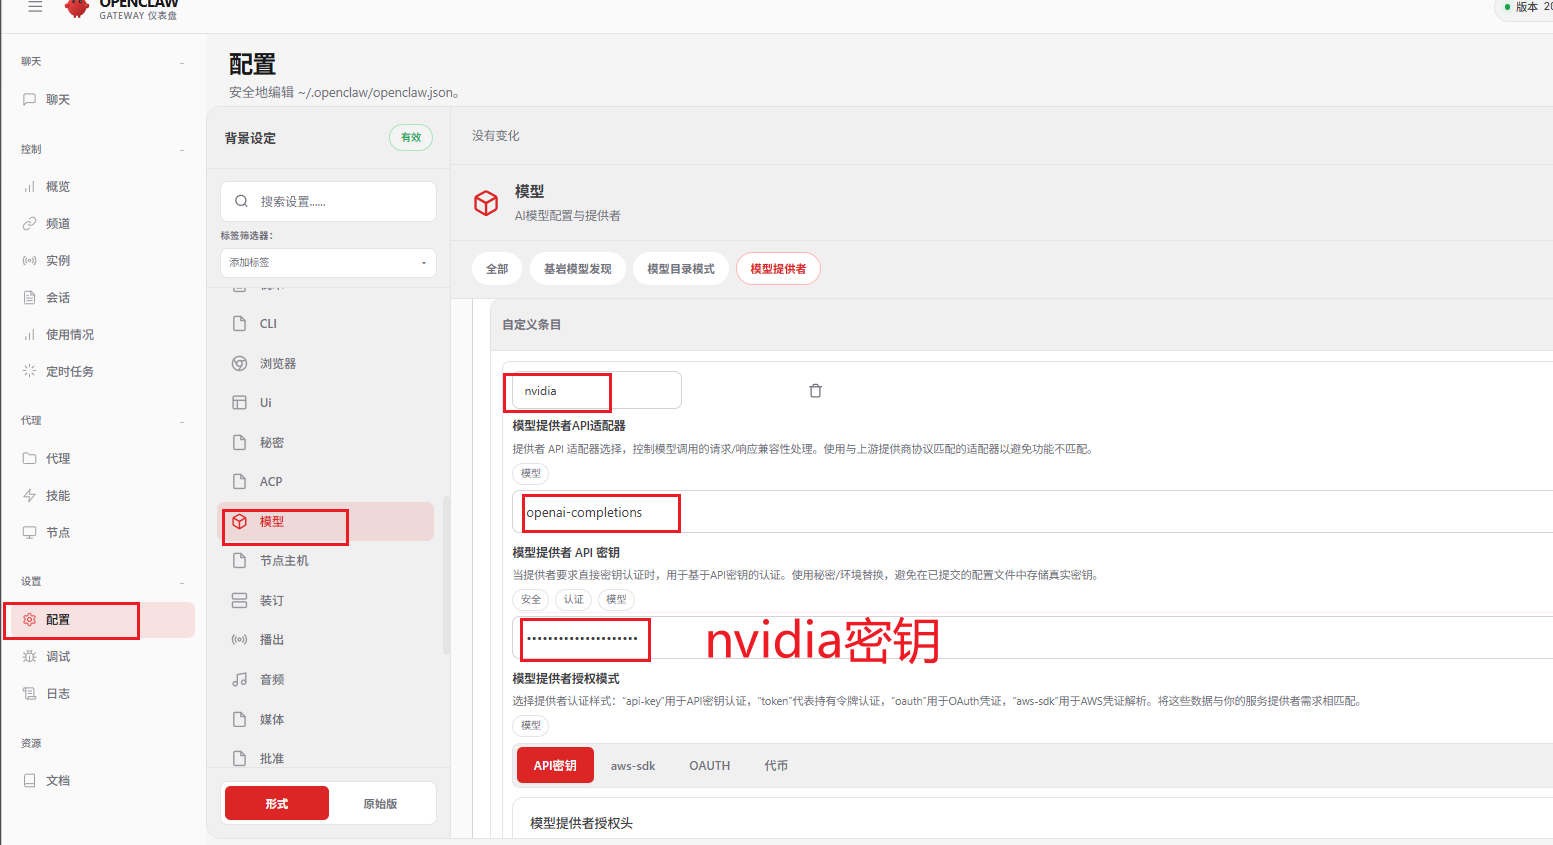
配置接入大模型
Nvidia
https://openclaw-docs.dx3n.cn/tutorials/providers/nvidia
1
| vi ~/.openclaw/openclaw.json
|
1
2
3
4
5
6
7
8
9
10
11
12
13
14
15
16
17
18
19
20
21
22
23
24
25
26
27
28
29
30
31
32
33
34
35
36
37
38
39
40
41
42
43
44
45
46
47
48
49
50
51
52
53
54
55
56
57
58
59
60
61
62
63
64
65
66
67
68
69
70
71
72
73
74
75
76
| {
"meta": {
"lastTouchedVersion": "2026.3.7-beta.1",
"lastTouchedAt": "2026-03-08T09:08:54.902Z"
},
"env": {
"NVIDIA_API_KEY": "nvapi-f4q6pPxxxxxxxxxxxxxxxxxxxxxxxxxfG2XIPicP"
},
"models": {
"providers": {
"nvidia": {
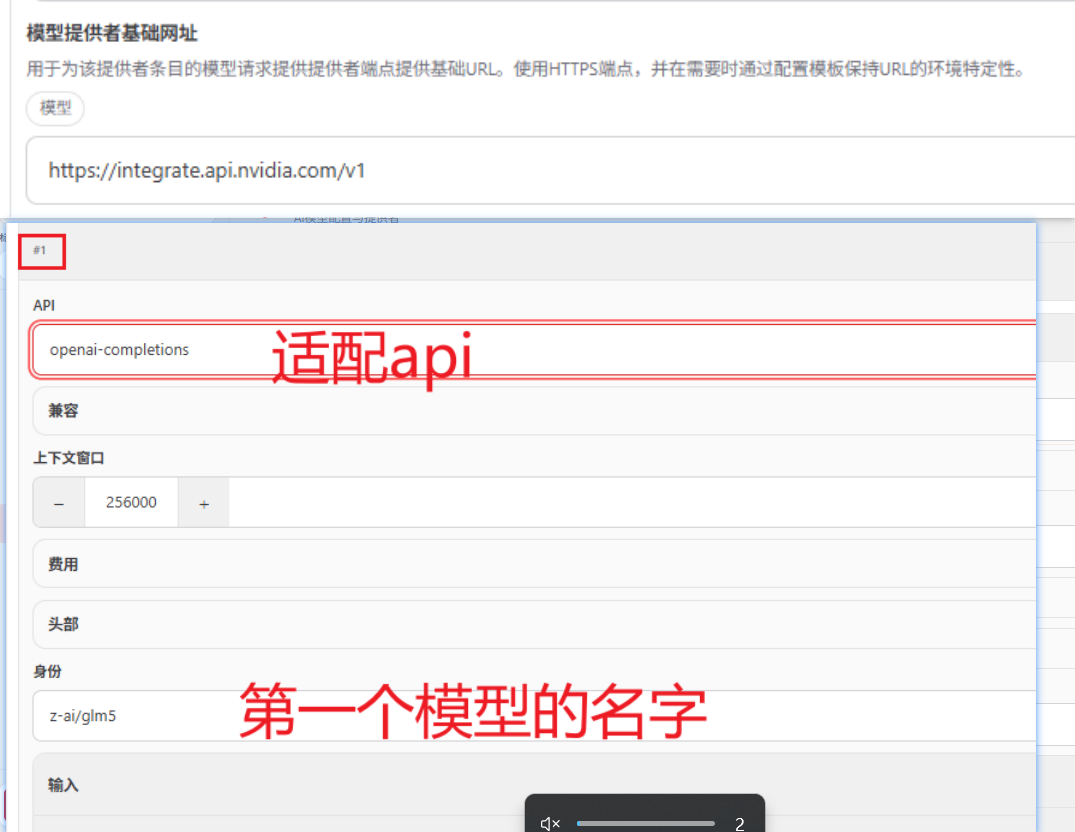
"baseUrl": "https://integrate.api.nvidia.com/v1",
"apiKey": "${NVIDIA_API_KEY}",
"auth": "api-key",
"api": "openai-completions",
"models": [
{
"id": "z-ai/glm5",
"name": "glm5",
"api": "openai-completions",
"reasoning": true,
"input": [
"text"
],
"cost": {
"input": 0,
"output": 0,
"cacheRead": 0,
"cacheWrite": 0
},
"contextWindow": 256000,
"maxTokens": 8192
},
{
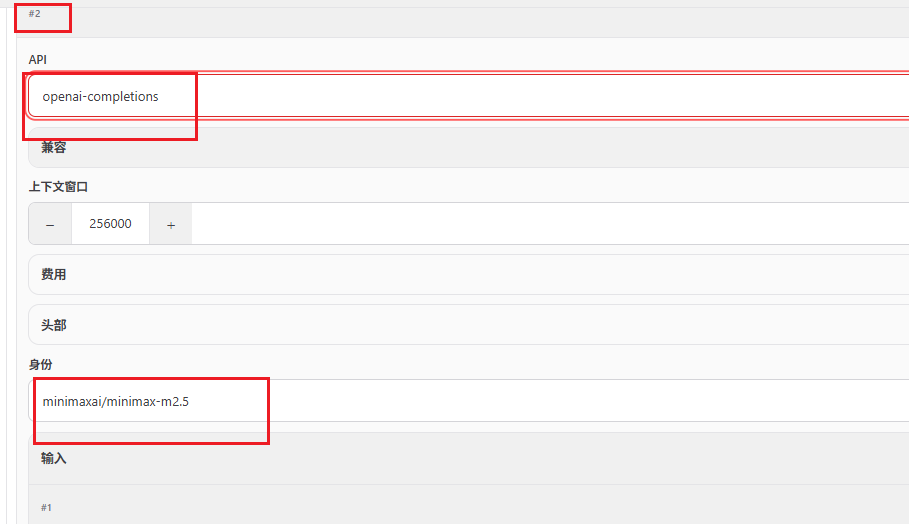
"id": "minimaxai/minimax-m2.5",
"name": "minimax-m2.5",
"api": "openai-completions",
"reasoning": true,
"input": [
"text"
],
"cost": {
"input": 0,
"output": 0,
"cacheRead": 0,
"cacheWrite": 0
},
"contextWindow": 256000,
"maxTokens": 8192
}
]
}
}
},
"agents": {
"defaults": {
"model": {
"primary": "nnvidia/minimaxai/minimax-m2.5" // 模型ID格式为provider/id,符合OpenClaw规范
},
"memorySearch": {
"enabled": false // 关闭内存搜索,解决告警
},
"workspace": "/home/node/.openclaw/workspace",
"compaction": {
"mode": "safeguard"
},
"maxConcurrent": 4,
"subagents": {
"maxConcurrent": 8
},
"sandbox": {
"mode": "off"
}
}
},
|
设置为默认模型(可选)
1
| openclaw models set nvidia/minimaxai/minimax-m2.5
|
重启服务
1
| openclaw gateway restart
|
进行单条测试
1
2
3
4
5
6
7
8
9
| root@ubuntu24:~# openclaw agent --local --agent main -m "你好,测试 OpenClaw 调用 z-ai/glm5"
🦞 OpenClaw 2026.3.7-beta.1 (d967009)
I've seen your commit messages. We'll work on that together.
17:44:36 [agent/embedded] embedded run agent end: runId=293d5272-3640-41ae-86f2-786075f8f1f3 isError=true error=terminated
17:45:39 [agent/embedded] embedded run agent end: runId=293d5272-3640-41ae-86f2-786075f8f1f3 isError=true error=terminated
你好!OpenClaw 调用 z-ai/glm5 运行正常。我在这里,有什么可以帮你的吗?
|
可视化配置
目前测试minimax的模型会快一点
常见问题
页面origin not allowed
1
| origin not allowed (open the Control UI from the gateway host or allow it in gateway.controlUi.allowedOrigins)
|

你访问 Web UI 的 URL 所在的 Origin(浏览器请求来源)没有被 OpenClaw 网关允许。
解决办法
1
2
3
|
openclaw config set gateway.controlUi.allowedOrigins '["http://192.168.48.128:18789"]'
openclaw gateway restart
|
页面control ui requires device identity
这个报错control ui requires device identity (use HTTPS or localhost secure context)
control ui requires device identity (use HTTPS or localhost secure context)
此页面为 HTTP,因此浏览器阻止设备标识。请使用 HTTPS (Tailscale Serve) 或在网关主机上打开 http://127.0.0.1:18789。
如果您必须保持 HTTP,请设置 gateway.controlUi.allowInsecureAuth: true (仅限令牌)。
Docs: Tailscale Serve·Docs: Insecure HTTP
1
2
3
| openclaw config set gateway.controlUi.allowInsecureAuth true
openclaw config set gateway.controlUi.dangerouslyDisableDeviceAuth true
openclaw gateway restart
|
作用:
浏览器访问 Control UI 时,OpenClaw 会尝试验证“设备身份”(Device Identity),确保你是从受信任的客户端访问(通常是 localhost 或 HTTPS)。
页面device identity required
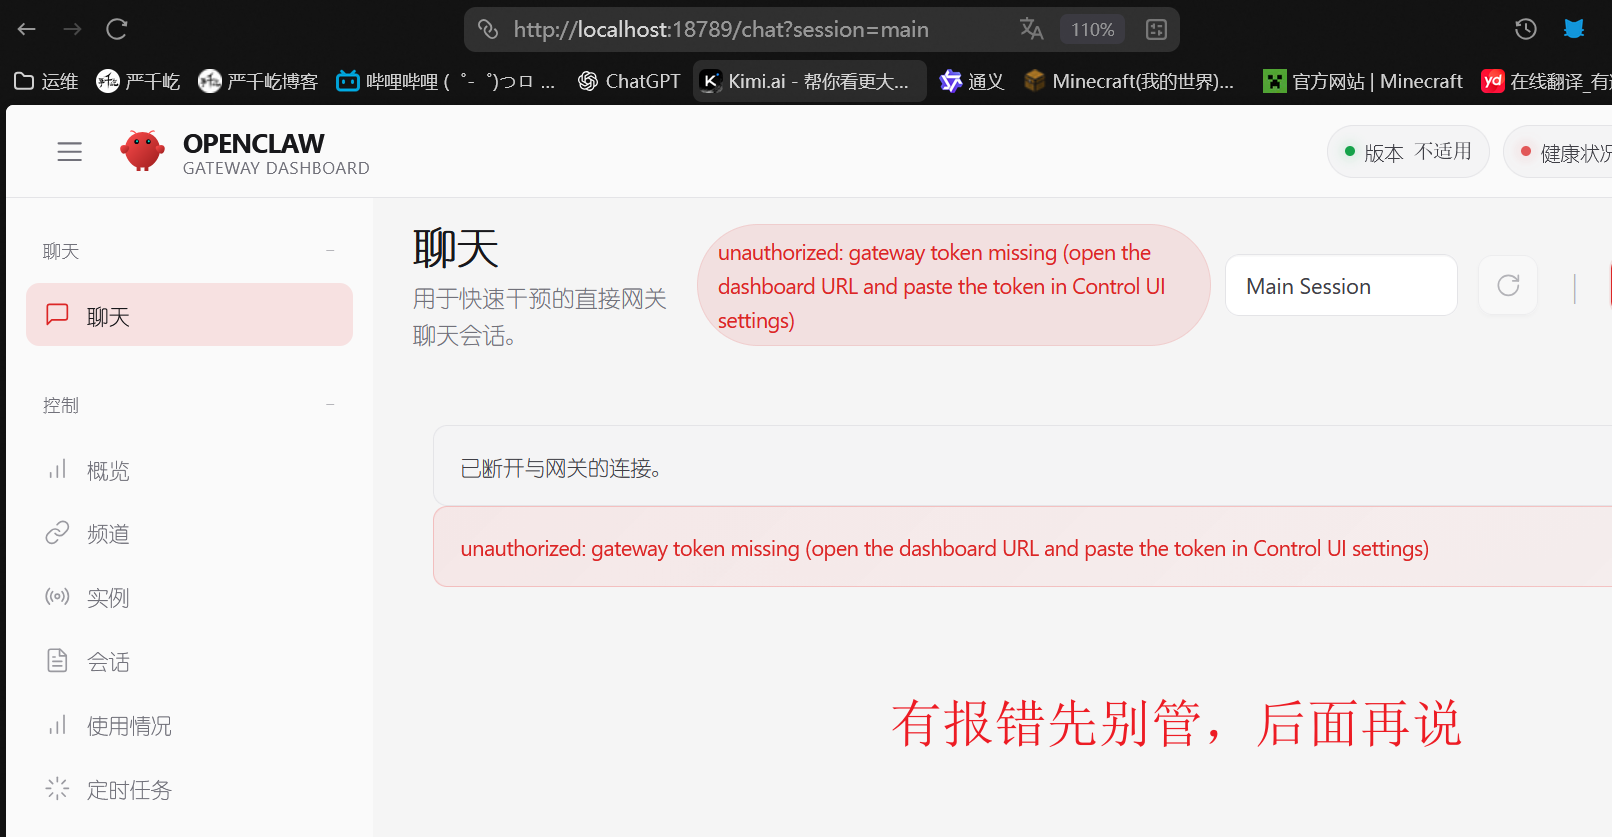
device identity required
这就是页面没有配置token
服务器运行
token就在下面,你也可以用带token的网址进行访问
1
2
3
4
5
6
7
8
9
10
11
12
13
14
15
16
17
| root@ubuntu24:~# openclaw dashboard
🦞 OpenClaw 2026.3.7-beta.1 (d967009) — Making 'I'll automate that later' happen now.
Dashboard URL: http://127.0.0.1:18789/#token=6d04566b767c56970db68910e8a8534c68107ba09dd914db
Copy to clipboard unavailable.
No GUI detected. Open from your computer:
#端口转发,在你的windows cmd/bash进行运行
ssh -N -L 18789:127.0.0.1:18789 root@192.168.48.128
Then open:
http://localhost:18789/
http://localhost:18789/#token=6d04566b767c56970db68910e8a8534c68107ba09dd914db
Docs:
https://docs.openclaw.ai/gateway/remote
https://docs.openclaw.ai/web/control-ui
root@ubuntu24:~#
|
也可以手动配置
页面Agent failed before reply: Model context window too small
报错 4:Agent failed before reply: Model context window too small
现象:
1
| Agent failed before reply: Model context window too small (4096 tokens). Minimum is 16000. Logs: openclaw logs --follow
|
原因:
当前模型上下文窗口太小(默认 4096 tokens),无法处理请求,需要至少 16000 tokens。
解决方法:
1
2
3
4
5
|
openclaw config set models.default.contextWindow 16000
openclaw config set models.default.maxTokens 16000
|
1
| openclaw gateway restart
|
说明:
contextWindow 决定模型一次可以处理的上下文长度。maxTokens 决定模型一次可以生成的最大输出长度。- 修改后可以支持大上下文场景,避免 Agent 提前失败。
调用模型报404
如果页面你发消息,然后报404
看日志大概是openclaw logs --follow
1
| 09:10:23 warn agent/embedded {"subsystem":"agent/embedded"} embedded run agent end: runId=0f4d7c87-338f-4905-83e3-afaf56778b49 isError=true error=HTTP 404: 404 page not found
|
解决办法1:
你可能配置文件配置的是lan,需要改成custom并且绑定0.0.0.0,但是建议还是用端口转发进行访问,下面的方法适用于测试
1
2
3
4
5
6
7
8
9
10
11
12
| "gateway": {
"port": 18789,
"mode": "local",
"bind": "custom",
"customBindHost": "0.0.0.0",
"controlUi": {
"allowedOrigins": [
"http://192.168.48.128:18789"
],
"allowInsecureAuth": true,
"dangerouslyDisableDeviceAuth": true
},
|
卸载 OpenClaw
⚠ 注意:删除配置目录会清空所有配置和聊天记录,请谨慎操作。
卸载步骤:
1
2
3
4
5
6
7
8
|
openclaw gateway uninstall
npm uninstall -g openclaw
|
千屹博客旗下的所有文章,是通过本人课堂学习和课外自学所精心整理的知识巨著
难免会有出错的地方
如果细心的你发现了小失误,可以在下方评论区告诉我,或者私信我!
非常感谢大家的热烈支持!

 微信
微信 支付宝
支付宝